My little Angels not

My little Angels not
2009 Spring

blog background

Followers

Tuesday, 26 May 2009

I had enough of my old jeans

Has it ever happened to you? Did you through it away?! Well I didn't! As mum of two and spending whatever I can on crafting I hardly ever spend money on clothing ,because of that I decided to alter these old jeans. I cut of the fraying bit from the bottom BUT I have no sewing machine so out come the good old touch&bond (time will tell if it works).This is how it looked before I touched it


I've got sooooooo many material samples so I decided to put them in good use. I cut some flowers out from the orange&red dotted material and from the orange checked material. From green I cut out a doodle and once it was stuck to my trousers I stuck the flowers on to it too.For the back just cut out two flowers with leaves. Now my jeans are funky and the best of it NO ONE ELSE GOT IT :-)


Wendy's sketch challenge #20

This week Wendy gave us no sketch but a link (http://fred-she-said.blogspot.com/2008/07/digi-freebie-pink-mellow.html ) to those gorgeous flowers. This is what I come up with.
I printed 4 sheet of big flowers, $ sheet of backing paper and 2 sheet of flowers. The big flowers I used as my base card,1st I cut the middle away then I stuck it on the backing paper than I cut the big flower out (saved one cutting lol) Now I got 4 separate flower. Make it into card I used a big ribbon, I stuck it between 2 flowers and it made my card ready to decorate. In the middle got some butterfly stickers


Inside of my card. The insert is cut out with a circle punch than I inked it.


The back kept simple


The big butterfly close up


Saturday, 23 May 2009

Cards I made for In-laws part 2

In part two I decided to put the Xmas cards we gave over the years or they asked me to make some for them.


This Xmas card is a double pop up card with decoupage in the front


Materials I used:
Pre-printed Xmas card from my stash
4 A4 double sided card green/red
1-1 green/red pearl paper for matting and layering
1 embossed Xmas paper
Crafters Companion Quick cards for Xmas CD
Glitter Girls board
Angel punch
Some gems from stash
Peel off


With 2 A4 card scored in half and cut an oval in the middle, once I had the oval widow in the middle I done my valley and mountain fold. I made up my 2 pop out card and stuck it back to back. Hard part was over now I just had to decorate it.
Embossed 2 tree from the Glitter Girls board and decorated the tree with angels and star gem than I put it in its place. The letters are from the CD mounted on the embossed Xmas paper. The other side of the card printed a Xmas verse and 1 panel was left free to write in it.


The matching box for the card


Here Again I used my pre-printed Xmas card with the matching decoupage and the Glitter Girls board, green card and peel off


Inside of the card


This is a recycled Xmas card with a bit of matting and layering. Used my fancy corner punch bit of metal thread and bobs your ankle


In our old house in the loft found some Xmas cards and few in the same kind. Here I used 2 to decoupage it up. I used again my Crafters Companion CD for backing paper and boarder.


This is an other card found in the loft, again used 2 to decoupage it and the same Cd for backing paper and for the banner


2 cards up where I used the poinsettia on the front was the front of the card this is the insert I used as a topper. I just had to use it cos its so lovely and again I used my Crafters Companion CD for backing paper.
Oh the lady is decoupaged up too.


This is the inside of the card. I found the verse on Internet.


From the poinsettia I still had a bit of leftover and I put it in the midle of the frame. The frame is material I bought from Hobby Craft (I used to live 20 min walk away from it) The midle panel from the material been used in an other card, bit of glitter glue as a boarder. Is amasing how many cards you can make from 2 card


Here again I used one of my pre-printed Xmas card. If you pull the ribbon the secret massage revils

Yeeeeppppie

I manage to edit it ,still not perfect but better than it was before. HAve to go to sleep it's after 2am

Arrrrrrrrrrrr

Sorry my blog is a mess tryed to edit it but after click on publis the blog is the same after several tries had enough :-) so I'm gonna craft now to calm myself done.

Friday, 22 May 2009

Cards I made for In-laws

Since I've been together with Adrian (3yrs) I made some cards for my in-laws(as good as) and they asked me to make some as well. I never took picture of these cards(never thought I would do a blog or join a forum where I can share my work) so few weeks ago I asked Rob(my in-law) to take pictures of the cards I made over the years( I wonder why they kept all the cards :-) ???!!!). In the next few days I'll try to upload all the cards.


This is my exploding box from above I made for Adrian's mum on mothers day.


Materials I used:

I cut 1 12"x12" green paper

1 113/4"x113/4" red paper min 160gsm

1 12x12 fancy scrapbook paper( I used few left over squares from an other exploding box)

Few die cuts (made with my Wizard)

Crafters Companion Flowers Cd


Once the top been removed the inside reviles. I printed the verse on vellum and matted it on the fancy scrapbook paper.


The butterflies and the corners are die cuts


My father in-law asked for a Valentine day card.


Materials I used:

1 red A4 card

1 black glittered paper

Crafters Companion love CD

Joanna Sheen Dancing with Shadows CD

Peel offs & ribbon


When I made this card I didn't score it right but no one knows it only me( now you know it too)

Just done simple matting and layering outside and inside. I had a bit of left over from the Joanna Sheen's backing paper what I used as a border


This is the matching envelop


I made this for Fathers day


Materials I used:

2 white card abt 210 gsm

1 white card abt 160 gsm

Ribbon

Chris Warner Cherished moments:The attic CD

Crafters Companion Men's collection CD


I printed a tag out from The attic CD, turned it over and printed on the other side of the paper. I folded my card cut it out and the base was ready to decorate. For outside I printed letters from the Men's collection CD, for inside I used my little punches to do the "dad". Unfortunately there isn't a picture of the booklet opened, its an origami booklet very easy to make. Will do tutorial for it soon. I think the topper come from the Crafters Companion CD too.


This Rob's birthday card


Materials I used:

3 A4 card( 2 for the box)

3 160 gsm paper for the teabag&backing paper&toppers

Chris Warner Cherished moments:The attic CD


It's a very simple triangle card. The topper is

teabag folding


The matching box


Rob asked for an Anniversary card.


Materials I used:

3 A4 card( 2 for the box)

1 holographic paper

butterfly punch

Crafters Companion Love CD

Joanna Sheen Victorian Companion CD

Peel offs

I made a matching box with it too

Thursday, 21 May 2009

This is what I done today


I went to London today to meet up with a friend whom I haven't seen for good 18 month . I had 2hrs journey up to London and back, so waist no time I took a bit of "snip-snip" with myself (as my other half's calls my crafting) and cut these out while I was traveling. On the right I got some stamped image cut out ready for masking. The left is from my decoupage book. I always carry decoupage book with me if I travel somewhere so I can do something with my hands.
I had a lovely time was really nice to see my friend and especially was nice to see her happy for a change (sorry Iboly but probably the first time in a long time I've seen you happy)


I was invited 2 weeks ago for my friends daughter's christening. I made this card/box. I had no template for this. I just had a picture in my head what I want and how should it look.

Materials I used:

2 pink A4 card from my stock
My punches
Pink organza ribbon
Joanna Sheen Heavenly Cards
loads of pinflair gel glue and vet glue


I punched out loads of flowers and couple of leaves and once my topper was in place I started to glue the flowers on with the pinflair gel glue.


This angle you can see this is a box

and the presie peeping out.


Once the "box" turned over
you can see its a card as well.

Wednesday, 20 May 2009

I try my best

I will try my best to put more pictures on my blog and I try not to lose my blog again :-)
I started it off with my latest work.

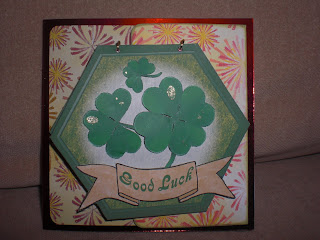
Good luck card


I wanted to do a good luck card but with a twist.
I printed 4 inserts out and cut the inside out and put it on the side. Once I had the four frame I stuck two together and made sure before I do that I put a hinge between to keep the frames together which acts my card now. Put 2-2 hols on top and bottom of each frame. I put holes on the toppers tool and put a gold thread through it to hang it from the top and secured it on the bottom. I done the same with the insert.


Back of the card. I used the left over cut out.


Inside of the card. One of the insert was printed
cut it up and matted and layered it
then stuck it on an other cut out.


My card with the matching envelop
sorry I covered up the address on it that's why the piece of
paper on the front

Good luck card

I was going to make a C5 card but this is what I made 5"x5". I had a happy accident while I was printing, the ink run out, so I ended up with a strip of yellow/red background. After changing the ink I turned the paper over and printed on the other side but I ended up with yellow/brown background(same printer setting). Instead of hide the strip I used it to my advantage and I introduced red miri board to bring the colours together.
This is inside of the card


This is what it's like when the front opened


Front topper opened up

Inside of the topper bit closer


And the matching envelop